Posts
-
Slack threads are one honking great idea -- let's use more of those!
Slack, one of the world’s most popular business communication platforms, launched the threaded conversations feature over 3 years ago. To this day, there are still people who don’t use them, be either for inertia, personal taste, or because they don’t understand its purpose. The goal of this article is to illustrate that by doing the effortless action of clicking the button to Start/View a thread when answering a message, you will be improving not only the life of your future self but doing a huge favor to all your colleagues.
Threaded messages are not just a communication style. They rely on one single pillar to improve the chat tool usability: reduce distractions by giving freedom to their users. Freedom in the sense that they can choose which conversation streams to follow, without having to leave or mute channels - things that may not be wanted or even feasible. And there are many nice side-effects to get in return. Let’s go through some Slack messaging characteristics to better understand their implications.
There’s no need to send multiple separate messages
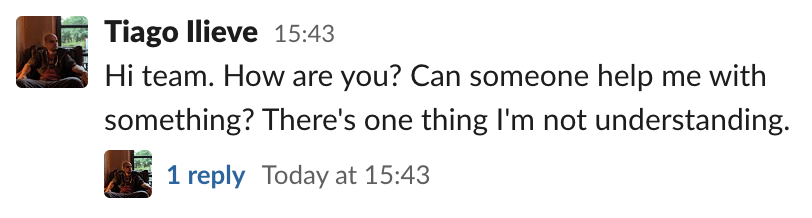
Which of the following examples is easier to understand:
A bunch of messages sent separately?
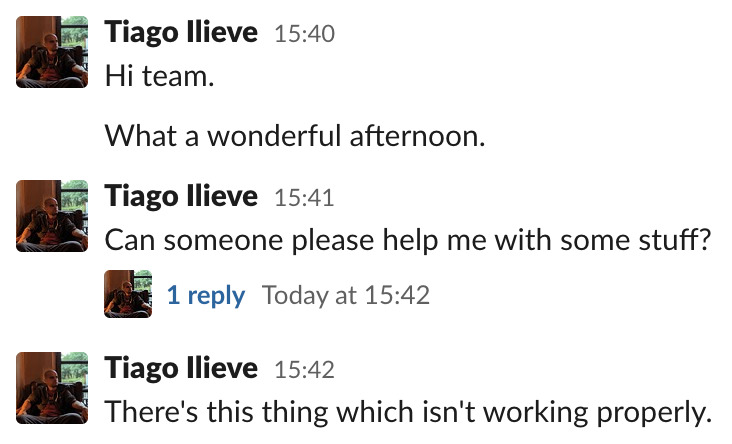
Or a single message containing all the needed information:
It’s important to notice that the second example directly benefits the usage of threads. The messages that originated it are not scattered around. Also, if you need to append more information, the message may be edited (depending on the Workspace settings). That’s not just aesthetically pleasing, the main issue is that…
Every message sent to a channel is a potential disruption
A channel message may not result in a notification sent to your cellphone or desktop browser, but there are a couple of implications. First, there’s the “unread messages” icon, where the tab favicon turns white. This icon per se can catch someone else’s attention, making them wonder whether their assistance is needed or not. Second, there’s the problem that everybody will have to catch up with all channel messages when they return after being away from the chat. By using threads, the number of channel messages is reduced, making it easier for people to skim through the unread ones, choosing what they need to follow.
Be careful when using the “also send to #channel” option
There’s an option to also send the message to channel when replying to a thread. It should be used with care, for the reasons mentioned above: it will generate a channel message that comes with all its implications. It’s fine to use it, for instance, when sending a reminder to a thread that was started a while ago and needs attention from people that might have not seen it. Selecting this option just to “make a point”, showing what are you are answering to people that might not be interested in the thread may sound condescending and should be avoided.
A thread is a group of related messages
The main goal of using threads - grouping related messages - facilitates a few use cases. A thread can be, for instance, a support request from another team. After the issue is solved, one can tag it with a checkmark emoji indicating that it was concluded.
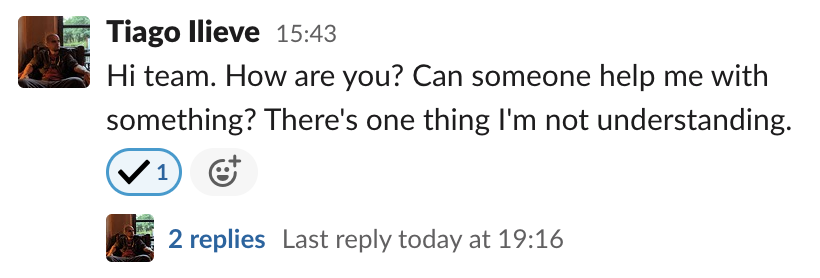
This can either help someone else taking the shift in understanding if any action is needed or an interested third-party to figure if the problem was properly answered/addressed without going through all the messages. Without a thread, it’s hard - impossible in high-traffic channels - to even figure where the conversation ended.
Threads improve message history significantly
Another situation greatly improved by threads is when going through the message history, which is especially useful in the paid - and unlimited - Slack version. Either by using the search or going through a link, when finding the relevant thread all the information is in there: the parent message containing the whole context, all the discussion properly indicating where it started and where it ended. The true value of that can be easily seen, for instance, when a link to discussion is attached to a ticket in the issue tracker and accessed months later.
Closing thoughts
Threads were invented with a noble goal: to make text-based communication more efficient. Even if it might be tempting to take a shortcut and start typing a response when you see a message in a channel, remember that clicking on the Start/View thread button is a small step for you, but a giant leap for whole chatting experience. By doing that the life quality of everyone that might be involved in a Slack conversation, either at that exact point in time or in a long time in the future, will be greatly improved.
-
Formatting a list of strings in Ansible
My Kubernetes Ansible setup - which is, to this date, still the easiest way to bootstrap an on-premises Kubernetes cluster - has a task that installs the packages tied to a specific Kubernetes version. When using it with an Ansible version newer than the one used when it was written, I was bothered by the following deprecation warning:
[DEPRECATION WARNING]: Invoking "apt" only once while using a loop via
squash_actions is deprecated. Instead of using a loop to supply multiple items
and specifying `name: "{{ item }}={{ kubernetes_version }}-00"`, please use
`name: '{{ kubernetes_packages }}'` and remove the loop. This feature will be
removed in version 2.11. Deprecation warnings can be disabled by setting
deprecation_warnings=False in ansible.cfg.
This warning a bit misleading. It’s clear that
item, which comes from thekubernetes_packagesvariable used in awith_itemsoption, is just one part of the equation. The package name is being interpolated with its version, glued together with other characters (=and-00) that will produce something likekubectl=1.17.2-00. Changing it tokubernetes_packagesisn’t enough. The process of replacing this in-place interpolation by a proper list, as Ansible wants, can be achieved in some ways like:- Write down a list that interpolates hard-coded package names with version, like:
kubectl={{ kubernetes_version }}-00. The problem is that this pattern has to be repeated for every package. - Find a way do generate this list dynamically, by applying the interpolation to every item of the
kubernetes_packageslist.
Repetition isn’t always bad, but I prefer to avoid it here. The latter option can be easily achieved in any programming language with functional constructs, like JavaScript, which offers a
map()array method that accepts a function (here, an arrow function) as the argument and returns another array:let pkgs = ['kubelet', 'kubectl', 'kubeadm']; let version = '1.17.2'; pkgs.map(p => `${p}=${version}-00`); (3) ["kubelet=1.17.2-00", "kubectl=1.17.2-00", "kubeadm=1.17.2-00"]Python, the language in which Ansible is written, offers a
map()function which accepts a function (here, a lambda expression) and a list as arguments. The object it returns can then be converted to a list:In [1]: pkgs = ['kubelet', 'kubectl', 'kubeadm'] In [2]: version = '1.17.2' In [3]: list(map(lambda p: '{}={}-00'.format(p, version), pkgs)) Out[3]: ['kubelet=1.17.2-00', 'kubectl=1.17.2-00', 'kubeadm=1.17.2-00']That’s be supposed to be similarly easy in Ansible, given that Jinja, its template language, offers a
format()filter. The problem is that it does not - and will not - support combiningformat()andmap()filters. Another way to do the same would be to use theformat()filter in a list comprehension, but that’s also not supported. But not all hope is lost, as Ansible supports additional regular expression filters, likeregex_replace(). It can be used in many different ways, but here we will use it for doing a single thing: concatenate the package name with a suffix made of another string concatenation operation. This way, the following task:- name: install packages apt: name: "{{ item }}={{ kubernetes_version }}-00" with_items: "{{ kubernetes_packages }}"Is equivalent to:
- name: install packages
  apt:
    name: "{{ kubernetes_packages |
      map('regex_replace', '$', '=' + kubernetes_version + '-00') |
      list
    }}"
The key is that the
'$'character matches the end of the string, so replacing it is akin to concatenating two strings. Thelistfilter in the end is needed because, just like the equivalent Python built-in function, the Jinjamap()filter also returns a generator. This object then needs to be converted to a list, otherwise, it would result in errors likeNo package matching '<generator object do_map at 0x10bbedba0>' is available, given that its string representation will be used as the package name. - Write down a list that interpolates hard-coded package names with version, like:
-
Web app updates without polling
A co-worker wasn’t happy with the current solution to update a page in our web app, polling some API endpoints every minute. This isn’t just wasteful, as most of the time the requests didn’t bring new data, but also slow, as every change can take up to a minute to propagate. He asked if I knew a better way to do that and while I didn’t have an answer to give right away, I do remember to have heard about solutions for this problem in the past. A quick Stack Overflow search showed three options:
- Long polling: basically what we were already doing.
- WebSockets: persistent connections that can be used to transfer data in both ways.
- Server-Sent Events (SSEs): one-way option to send data from server to client, where the connection is closed after the request is finished.
WebSockets looked like the most interesting option. Their name also reminded me of another technique applications use to push updates to others: Webhooks. That’s how, for instance, a CI/CD job is triggered after changes to a repository are pushed to GitHub. The only problem is that webhooks are, by definition, a server-to-server interaction. A server cannot send an HTTP request to a client. I started to question myself: if so, how do websites like the super cool Webhook.site works?
The
Webhook.siteis a tool meant to debug webhooks. One can set up a webhook, for instance, in GitHub, and inspect the entire body/headers/method of the request in a nice interface, without having to resort to set up a server to do that. The most interesting part is that the requests sent by the webhooks are displayed on the webpage in (near) real-time: exactly the problem I was looking to solve. So I started to look around to figure out how they managed to achieve that.Digging through the page source, I found some references to Socket.IO, which is indeed an engine that was designed to offer bidirectional real-time communication. Before even trying to use it, I tried to understand if it worked over WebSockets and found the following quote on its Wikipedia page:
Socket.IO is not a WebSocket library with fallback options to other realtime protocols. It is a custom realtime transport protocol implementation on top of other realtime protocols.
So,
Socket.IOmay be a nice tool, but not the best alternative for our use-case. There’s no need to use a custom protocol where we might have to, for instance, replace our server implementation when we can opt for a IETF/W3C standard like WebSockets. So I started to think about how webhooks can be integrated with WebSockets.The easiest way would be to store, in-memory, all the currently open WebSocket connections to an endpoint and loop over them every time a webhook request came. The problem is that this architecture doesn’t scale. It’s fine when there’s a single API server, but it wouldn’t work when there are multiple clients connected to different instances of the API server. In the latter case, only a subset of the clients - the ones residing in-memory on the same server which received the webhook - would be notified about this update.
By this point, a previous co-worker and university colleague mentioned that with Redis it would be even simple to achieve that. It didn’t immediately make sense to me, as at first, I thought Redis would only replace the in-memory connections list until I found out about the
PUBLISHcommand. Not only Redis would take care of almost all the logic involved in notifying the connected clients: when combining them with theSUBSCRIBEcommand, it actually offers an entire Pub/Sub solution. It was awesome to learn that the tool I used for over 5 years mainly as a centralized hash table - or queue at max - was the key to simplify the whole architecture.Now it was the time to assemble the planned solution. With Gin + Gorilla WebSocket + Redis in the Backend, together with React in the Frontend, I’ve managed to create Webhooks + WebSockets, a very basic clone of the Webhook.site, showing how real-time server updates can be achieved in a web app by combining the two standards, backed by multiple technologies. The source code is available at GitHub.
-
The Cloud Computing Era is now
I’ve been impressed by how the Cloud Computing landscape changed in the past two years. I totally agree with this quote from Cloudflare:
“And yet, with many serverless offerings today, the first thing they do is the thing that they promised you they wouldn’t — they make you think about servers.”
A solution isn’t serverless if it makes the user think about how much computing resources they need or where these will be located. A truly serverless offer will figure everything that is needed to run a service, in a declarative, not imperative, way. I’ve been amazed by how it’s now easy to combine different services to achieve use cases that simply wouldn’t be possible just a couple of years ago.
One thing that I’ve been doing in the past weeks is to automate some of the manual steps in the tool about water distribution restrictions I wrote. For instance, the page where they post the interruption schedule doesn’t offer an RSS feed. This forced me to bookmark the link and visit it every week, waiting for the new schedule to be published - something that can happen any day between Wednesday and Friday. So I started to wonder: “what if I crawl that page and create an RSS feed for that? This way I can put it in Feedly and be actively informed about new publications”.
Been playing with different HTML parsers recently, like cheerio and goquery - both inspired by the nice, easy-to-use and battle-tested jQuery API, crawling the web page would be the easiest part. The problem is: how was it going to be hosted - and worse, updated frequently? I could set up a cron job in one of my machines, generate the files and publish it with any HTTP server, but that looked like too much of a hassle: one shouldn’t need a server to host and regularly update a static web page in 2020.
I began to think if it would be possible to use the two services that were already in place, Cloudflare Workers Sites and GitHub Actions, the CI/CD solution, to achieve this goal. I mean, of course, the hosting part was already solved, but by the time I didn’t know that it’s possible to schedule events in GitHub Actions, down to 5-minute intervals, in a cron-like syntax:
on:
  schedule:
    - cron:  '*/5 * * * *'
I’m truly astonished by what can we do these days without thinking about servers at all - it’s like IFTTT on steroids. I didn’t have to choose in which region those services are located, nor specify how much CPU/memory/disk/other hardware resources should be allocated to them: I only asked for well-defined tasks, like building the project and deploying it, to be executed on a scheduled basis. And in the GitHub Actions case, there wasn’t even a need to pay for it.
Thinking about how straightforward the whole process have been, I’m inclined to not host anything on a server owned by me ever again.
-
Running a single test (or a subset of tests) in Go
In the very beginning of the Go documentation about tests in the standard library, there’s a section about subtests. The idea is that with the
-runargument ofgo testit’s possible to choose which tests are going to be executed in a single run of a project’s test suite. That doesn’t just makes it possible to focus on tests which are relevant to the parts of the code which are being worked on, but it’s specially useful when there’s a need to avoid slow tests or a big suite full of them.The following code uses the standard
testingpackage:package main import ( "testing" ) func TestA(t *testing.T) { want := 2 got := 2 if got != want { t.Fatal("Wrong result!") } } func TestB(t *testing.T) { want := 4 got := 4 if got != want { t.Fatal("Wrong result!") } }These tests can be filtered as expected:
$ go test -v .
=== RUN   TestA
--- PASS: TestA (0.00s)
=== RUN   TestB
--- PASS: TestB (0.00s)
PASS
ok      github.com/myhro/go-tests-example       0.181s
$ go test -run TestA -v .
=== RUN   TestA
--- PASS: TestA (0.00s)
PASS
ok      github.com/myhro/go-tests-example       0.188s
When using the standard
testingpackage,-runis all that is needed. The problem is that this doesn’t work for third-party test suites, like gocheck:package main import ( "testing" . "gopkg.in/check.v1" ) func Test(t *testing.T) { TestingT(t) } type MainSuite struct{} var _ = Suite(&MainSuite{}) func (s *MainSuite) TestA(c *C) { want := 2 got := 2 c.Assert(got, Equals, want) } func (s *MainSuite) TestB(c *C) { want := 4 got := 4 c.Assert(got, Equals, want) }When running this test suite with
-run, all that it yields isno tests to run:$ go test -v . === RUN Test OK: 2 passed --- PASS: Test (0.00s) PASS ok github.com/myhro/go-tests-example 0.270s $ go test -run TestA -v . testing: warning: no tests to run PASS ok github.com/myhro/go-tests-example 0.187s [no tests to run]This happens because
gocheckneeds a different parameter to filter tests out. The right way to do it is with-check.f:$ go test -check.f TestA -v . === RUN Test OK: 1 passed --- PASS: Test (0.00s) PASS ok github.com/myhro/go-tests-example 0.687sAnother test library that needs a different parameter is Testify. With this example:
package main

import (
	"testing"

	"github.com/stretchr/testify/assert"
	"github.com/stretchr/testify/suite"
)

type MainSuite struct {
	suite.Suite
}

func TestMainSuite(t *testing.T) {
	suite.Run(t, new(MainSuite))
}

func (s *MainSuite) TestA() {
	want := 2
	got := 2
	assert.Equal(s.T(), want, got)
}

func (s *MainSuite) TestB() {
	want := 4
	got := 4
	assert.Equal(s.T(), want, got)
}
Tests are filtered with
-testify.m:$ go test -v . === RUN TestMainSuite === RUN TestMainSuite/TestA === RUN TestMainSuite/TestB --- PASS: TestMainSuite (0.00s) --- PASS: TestMainSuite/TestA (0.00s) --- PASS: TestMainSuite/TestB (0.00s) PASS ok github.com/myhro/go-tests-example 0.762s $ go test -testify.m TestA -v . === RUN TestMainSuite === RUN TestMainSuite/TestA --- PASS: TestMainSuite (0.00s) --- PASS: TestMainSuite/TestA (0.00s) PASS ok github.com/myhro/go-tests-example 0.220sI wasn’t able to find the exact explanation why
-rundoesn’t work for third-party test suites. My reasoning is that the regulargo testcommand is only aware ofTest*functions, not methods that are tied to a particular test suitestruct. The later have to be properly loaded, and filtered if needed, by their own libraries. Hence the need for a different argument.And what about running more than one test? All of the mentioned test libraries accept regular expressions when specifying test names, so both
TestAandTestBcan be selected withTest[AB].